This blog post got updated for SCDF 2.2.0, please continue reading here: GDELT on SCDF 2.2.0 : Bootstrapping spring cloud data flow on kubernetes using kubectl.
In the first part of our planned blog posts (processing GDELT data with SCDF on kubernetes) we go through the steps to deploy the latest Spring Cloud Data Flow (SCDF) Release 1.7.0 on Kubernetes , including the latest version of starter apps that will be used in the examples.
We stick to the manual steps described here in the official spring cloud dataflow documentation to deploy all components to our kubernetes cluster into a dedicated namespace scdf-170 to run the examples.
This installation will not be production-ready, it is about experimenting and to ensure compability as we experienced some incompabilities mixing own source/sink implementations based on Finchley.SR2 and the prepackaged Starter Apps based on Spring Boot 1.5 / Spring Cloud Streams 1.3.X.
Preparations
Clone the git repository to retrieve the neccessary kubernetes configuration files and switch to the 1.7.0.RELEASE branch:
git clone https://github.com/spring-cloud/spring-cloud-dataflow-server-kubernetes
cd spring-cloud-dataflow-server-kubernetes
git checkout v1.7.0.RELEASE
installation with kubectl
We want to use a dedicated namespace scdf-170 for our deployment, so we create it first:
echo '{ "kind": "Namespace", "apiVersion": "v1", "metadata": { "name": "scdf-170", "labels": { "name": "scdf-170" } } }' | kubectl create -f -
Afterwards we can deploy the dependencies (kafka/mysql/redis) and the spring cloud dataflow server itself:
kubectl create -n scdf-170 -f src/kubernetes/kafka/
kubectl create -n scdf-170 -f src/kubernetes/mysql/
kubectl create -n scdf-170 -f src/kubernetes/redis/
kubectl create -n scdf-170 -f src/kubernetes/metrics/metrics-svc.yaml
kubectl create -n scdf-170 -f src/kubernetes/server/server-roles.yaml
kubectl create -n scdf-170 -f src/kubernetes/server/server-rolebinding.yaml
kubectl create -n scdf-170 -f src/kubernetes/server/service-account.yaml
kubectl create -n scdf-170 -f src/kubernetes/server/server-config-kafka.yaml
kubectl create -n scdf-170 -f src/kubernetes/server/server-svc.yaml
kubectl create -n scdf-170 -f src/kubernetes/server/server-deployment.yaml
verify and enable access
kubectl -n scdf-170 get all
Output should look like:
NAME                                READY     STATUS    RESTARTS   AGE
pod/kafka-broker-696786c8f7-fjp4p   1/1       Running   1          5m
pod/kafka-zk-5f9bff7d5-tmxzg        1/1       Running   0          5m
pod/mysql-f878678df-2t4d6           1/1       Running   0          5m
pod/redis-748db48b4f-8h75x          1/1       Running   0          5m
pod/scdf-server-757ccb576c-9fssd    1/1       Running   0          5m

NAME                  TYPE           CLUSTER-IP       EXTERNAL-IP   PORT(S)                      AGE
service/kafka         ClusterIP      10.98.11.191     <none>        9092/TCP                     5m
service/kafka-zk      ClusterIP      10.111.45.25     <none>        2181/TCP,2888/TCP,3888/TCP   5m
service/metrics       ClusterIP      10.104.11.216    <none>        80/TCP                       5m
service/mysql         ClusterIP      10.99.141.105    <none>        3306/TCP                     5m
service/redis         ClusterIP      10.99.0.146      <none>        6379/TCP                     5m
service/scdf-server   LoadBalancer   10.101.180.212   <pending>     80:30884/TCP                 5m

NAME                           DESIRED   CURRENT   UP-TO-DATE   AVAILABLE   AGE
deployment.apps/kafka-broker   1         1         1            1           5m
deployment.apps/kafka-zk       1         1         1            1           5m
deployment.apps/mysql          1         1         1            1           5m
deployment.apps/redis          1         1         1            1           5m
deployment.apps/scdf-server    1         1         1            1           5m

NAME                                      DESIRED   CURRENT   READY     AGE
replicaset.apps/kafka-broker-696786c8f7   1         1         1         5m
replicaset.apps/kafka-zk-5f9bff7d5        1         1         1         5m
replicaset.apps/mysql-f878678df           1         1         1         5m
replicaset.apps/redis-748db48b4f          1         1         1         5m
replicaset.apps/scdf-server-757ccb576c    1         1         1         5m
As the scdf server will automatically generate a random password for the user “user” on first startup, we need to grep the log output (using your individual scdf-service pod name, see output of previous command):
kubectl logs -n scdf-170 scdf-server-757ccb576c-9fssd | grep "Using default security password"
output should look like
Using default security password: 8d6b58fa-bf1a-4a0a-a42b-c7b03ab15c60 with roles 'VIEW,CREATE,MANAGE'
To access the UI (and rest-api for the cli) you can create a port-forward to the scdf-server pod (using your individual scdf-service pod name, see output of “kubectl -n scdf-170 get all”):
kubectl -n scdf-170 port-forward scdf-server-757ccb576c-9fssd 2345:80
where 2345 would be the local port on your machine where you can now access the ui and the rest-api.
Install the dataflow cli
You can download the jar file directly from spring’s maven repository:
wget https://repo.spring.io/release/org/springframework/cloud/spring-cloud-dataflow-shell/1.7.0.RELEASE/spring-cloud-dataflow-shell-1.7.0.RELEASE.jar
and start the cli:
java -jar spring-cloud-dataflow-shell-1.7.0.RELEASE.jar \
--dataflow.username=user \
--dataflow.password= \
--dataflow.uri=http://localhost:2345
The output should look like this:
   ...
 / ___| _ __  _ __(_)_ __   __ _   / ___| | ___  _   _  __| |
 \___ \| '_ \| '__| | '_ \ / _` | | |   | |/ _ \| | | |/ _` |
  ___) | |_) | |  | | | | | (_| | | |___| | (_) | |_| | (_| |
 |____/| .__/|_|  |_|_| |_|\__, |  \____|_|\___/ \__,_|\__,_|
  ____ |_|    _          __|___/                 __________
 |  _ \  __ _| |_ __ _  |  ___| | _____      __  \ \ \ \ \ \
 | | | |/ _` | __/ _` | | |_  | |/ _ \ \ /\ / /   \ \ \ \ \ \
 | |_| | (_| | || (_| | |  _| | | (_) \ V  V /    / / / / / /
 |____/ \__,_|\__\__,_| |_|   |_|\___/ \_/\_/    /_/_/_/_/_/

1.7.0.RELEASE

Welcome to the Spring Cloud Data Flow shell. For assistance hit TAB or type "help".
dataflow:>
Install starter apps
After the initial installation there are no applications (task/stream) registed. As you can see here (for stream apps), you need to pick a explicit combination of the packaging format (jar vs docker) and the messaging technology (Kafka vs RabbitMQ).
We will go for docker (because we are running on Kubernetes) and Kafka 0.10 as the messaging layer based on newer Spring Boot and Spring Cloud Stream versions (2.0.x + 2.0.x).
We can register all the available starter apps with a single cli command:
dataflow:>app import --uri http://bit.ly/Darwin-SR2-stream-applications-kafka-docker
Output:
Successfully registered .........
.................................
...... processor.pmml.metadata, sink.router.metadata, sink.mongodb]
and the Spring Cloud Task Starter Apps (based on Spring Boot 2.0.x + Spring Cloud Task 2.0.x):
dataflow:> app import --uri http://bit.ly/Dearborn-SR1-task-applications-docker


Successfully registered ..........
..................................
........ task.timestamp, task.timestamp.metadata]
You can verify the installation by listing all available applications:
dataflow:>app list
The Output should look like this:
╔═══╤══════════════╤═══════════════════════════╤══════════════════════════╤════════════════════╗
║app│    source    │         processor         │           sink           │        task        ║
╠═══╪══════════════╪═══════════════════════════╪══════════════════════════╪════════════════════╣
║   │file          │bridge                     │aggregate-counter         │composed-task-runner║
║   │ftp           │filter                     │counter                   │timestamp           ║
║   │gemfire       │groovy-filter              │field-value-counter       │timestamp-batch     ║
║   │gemfire-cq    │groovy-transform           │file                      │                    ║
║   │http          │grpc                       │ftp                       │                    ║
║   │jdbc          │header-enricher            │gemfire                   │                    ║
║   │jms           │httpclient                 │hdfs                      │                    ║
║   │load-generator│image-recognition          │jdbc                      │                    ║
║   │loggregator   │object-detection           │log                       │                    ║
║   │mail          │pmml                       │mongodb                   │                    ║
║   │mongodb       │python-http                │mqtt                      │                    ║
║   │mqtt          │python-jython              │pgcopy                    │                    ║
║   │rabbit        │scriptable-transform       │rabbit                    │                    ║
║   │s3            │splitter                   │redis-pubsub              │                    ║
║   │sftp          │tasklaunchrequest-transform│router                    │                    ║
║   │syslog        │tcp-client                 │s3                        │                    ║
║   │tcp           │tensorflow                 │sftp                      │                    ║
║   │tcp-client    │transform                  │task-launcher-cloudfoundry│                    ║
║   │time          │twitter-sentiment          │task-launcher-local       │                    ║
║   │trigger       │                           │task-launcher-yarn        │                    ║
║   │triggertask   │                           │tcp                       │                    ║
║   │twitterstream │                           │throughput                │                    ║
║   │              │                           │websocket                 │                    ║
╚═══╧══════════════╧═══════════════════════════╧══════════════════════════╧════════════════════╝
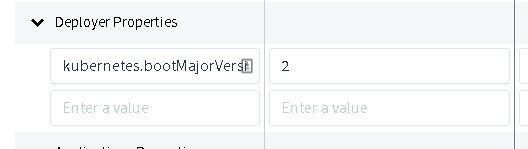
When you start using the starter apps in your first test stream definitions be aware that you need to add a special deployer property on the deployment screen (because we are using the spring 2 based starter apps):
kubernetes.bootMajorVersion=2
You can read more about the internal changes between 1.5 and 2.0 on the health and readiness probes here.
Continue reading on how to implement a custom source application using the reactive framework on spring cloud streams in our next blog post: Implementing a custom reactive source application for spring cloud data flow.