The Cloudera Manager is already capable of tracking usage data via Google Analytics, but that data is beeing send to a cloudera account. This blog post is about configuring the cloudera manager and changing the tracking id so that these usage metrics are being send to your own account.
Setup Google Analytics
Log into your Google Analytics account and create a new tracking id (looks like UA-XXXXXXX-X).
Enable the tracking of usage data
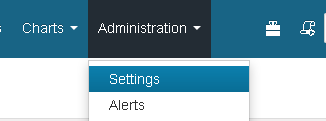
Log into your Cloudera Manager instance and browse to “Administration” -> “Settings”
and make sure that “Allow Usage Data Collection” is enabled:

replace the tracking id
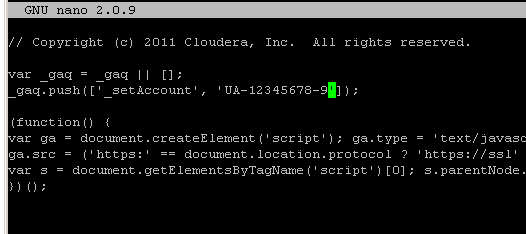
Now you need to edit a file on your Cloudera Manager server
cd /usr/share/cmf/webapp/static/ext/google-analytics/
nano scmx.js
And replace the existing google apps tracking id (UA-XXXXXXX-X) with your own id and save the file.
You change will be immediately active (no need to restart anything).
Be aware that this change will be overwritten when you update your Cloudera Manager instance so you need to reapply that change after every upgrade.